27 August 2011

Art Journal Page 7Aug11


STEPS 1 + 2
Paint! Whoever said, "once you use paint in your art journals, it becomes addicting," was right! There's nothing more fulfilling than laying down that first layer of color, usually after I've applied a layer of gesso with a cheapo "chip brush."

APPLICATION
I prefer to use a credit card to apply my acrylic paint because it's fast, clean-up is easy (keep a shallow bowl near-by, filled partially with water - or clean off immediately with a baby wipe or a rag), you use less paint and the BEST PART is that your pages won't stick. Rather than wasting leftover paint, just scrape it onto future pages (see my next post!)

TECHNIQUE
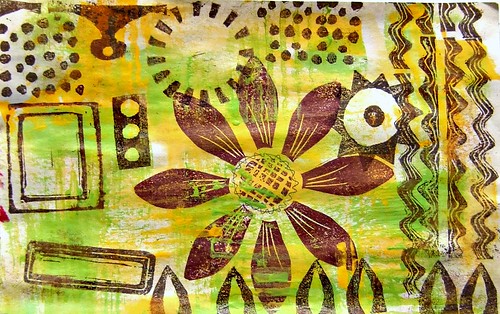
Start with a lighter color. Then, after scraping the 1st layer of paint across your page, scrape a dark or medium shade overtop of it. Next, use your fingers to drip random drops from a glass of water or block the nozzle on a spray bottle with a finger, for larger "glops!" Wait about 1 minute, blot the excess water with a paper towel and SCRAPE to reveal the lighter color underneath. Keep adding water, as needed.

LAYERS
Paper and I have always had this love affair. 10 years ago, i referred to myself as a "paper artist" and I've got a room-full to show for it! Vintage magazines, nat geo (used here), old dictionaries, ledgers, primary schoolbooks, ephemera, postcards, cab cards, sheet music, scrapbook paper, cardstock... the list goes on. So! it's super fun to incorporate that extra layer either before or after gesso or in between paint layers.

Another layer that's a must for me is using handcarved stamps and grabbing something from my "mark making" collection such as bubble wrap, sequin waste (used here), old shower curtain grommets, corks (used here)...


24 August 2011

the uglies


we all have 'em... in our Art Journals, that is! "let the inspiration flow" - guess it wasn't flowing MY way, that day, lol.

I've read both sides of the keep it or paint over it discussions, and truthfully, only you can make that call. For me, I got depressed every time I looked at it. About 5 weeks passed, I bought a few alphabet stencils in a Thrift Shop and had an "AHA" moment. Next, I simply pulled the tape off -used a little red acrylic paint and a spouncer to re-do the title. (luckily the old one was on masking tape!!) And... SCORE!

20 August 2011

Earrings: August 2011

Thanks, Gaby, for the inspiration!! XO


16 August 2011

Earrings: June 2011

Before I post a whole new batch of designs, I wanted to catch you up to date on a small sampling of the earrings I made for a local Art Show in early Summer. These eight pairs are currently on display in a retail location, and through a special arrangement with the owner, they are also available for sale in my Etsy shop, where I can create a custom listing if you spot something you like!

Convo me here or in my etsy shop!


12 August 2011

Basic Stamp Carving

more stamping by cookievf
more stamping, a photo by cookievf on Flickr.

Why buy basic shapes when you can carve them yourself! A few months ago I managed my first attempt at basic carving with a Speedball lino cutting tool and a block of flexible, pink Speedy-Carve. Dick Blick carries a 9" x 11 3/4" sheet for $21.00. Erasers are great for carving too!. And don't forget to save your wine corks :D

I stamped this "sample set" with a brown pigment inkpad on a sheet of blank newspaper; a nice weight to use in collage. I also used it to make my painted background papers, shown in an earlier blog post and on flickr as well. View the carved stamps and the painted papers here.

05 August 2011

Art Journal Page 18Jul11

painted a wash of green paint over a self-portrait,


"crackle" rubber stamp cube, in brown ink,


torn pieces of vintage wallpaper,


new fave color duct tape,


deco tape,


pink porfolio oil pastel,


applied molding paste with corrugated cardboard for texture.